
The arm is assembled, but the deck should still be detached. Wire and test the robot while the NoU3 terminals are easy to reach. If you haven't done Making a motor move yet, do it now; this page assumes your Arduino IDE and the Alfredo-NoU3 library are already set up. This sketch also needs BLE-Gamepad-Client from Arduino's Library Manager, as shown in that guide's Option B: Connect an Xbox or Steam controller directly section.
1. Wire it up
Set the deck beside the chassis and unplug the battery. Connect:
- Right drive motor → M1 (screw terminals M1+/M1-)
- Left drive motor → M8 (screw terminals M8+/M8-)
- Arm servo → S1 — ground (brown) on GND, power (red) on 5V, signal (orange) on the servo pin row
- Battery → barrel jack (see Battery options)
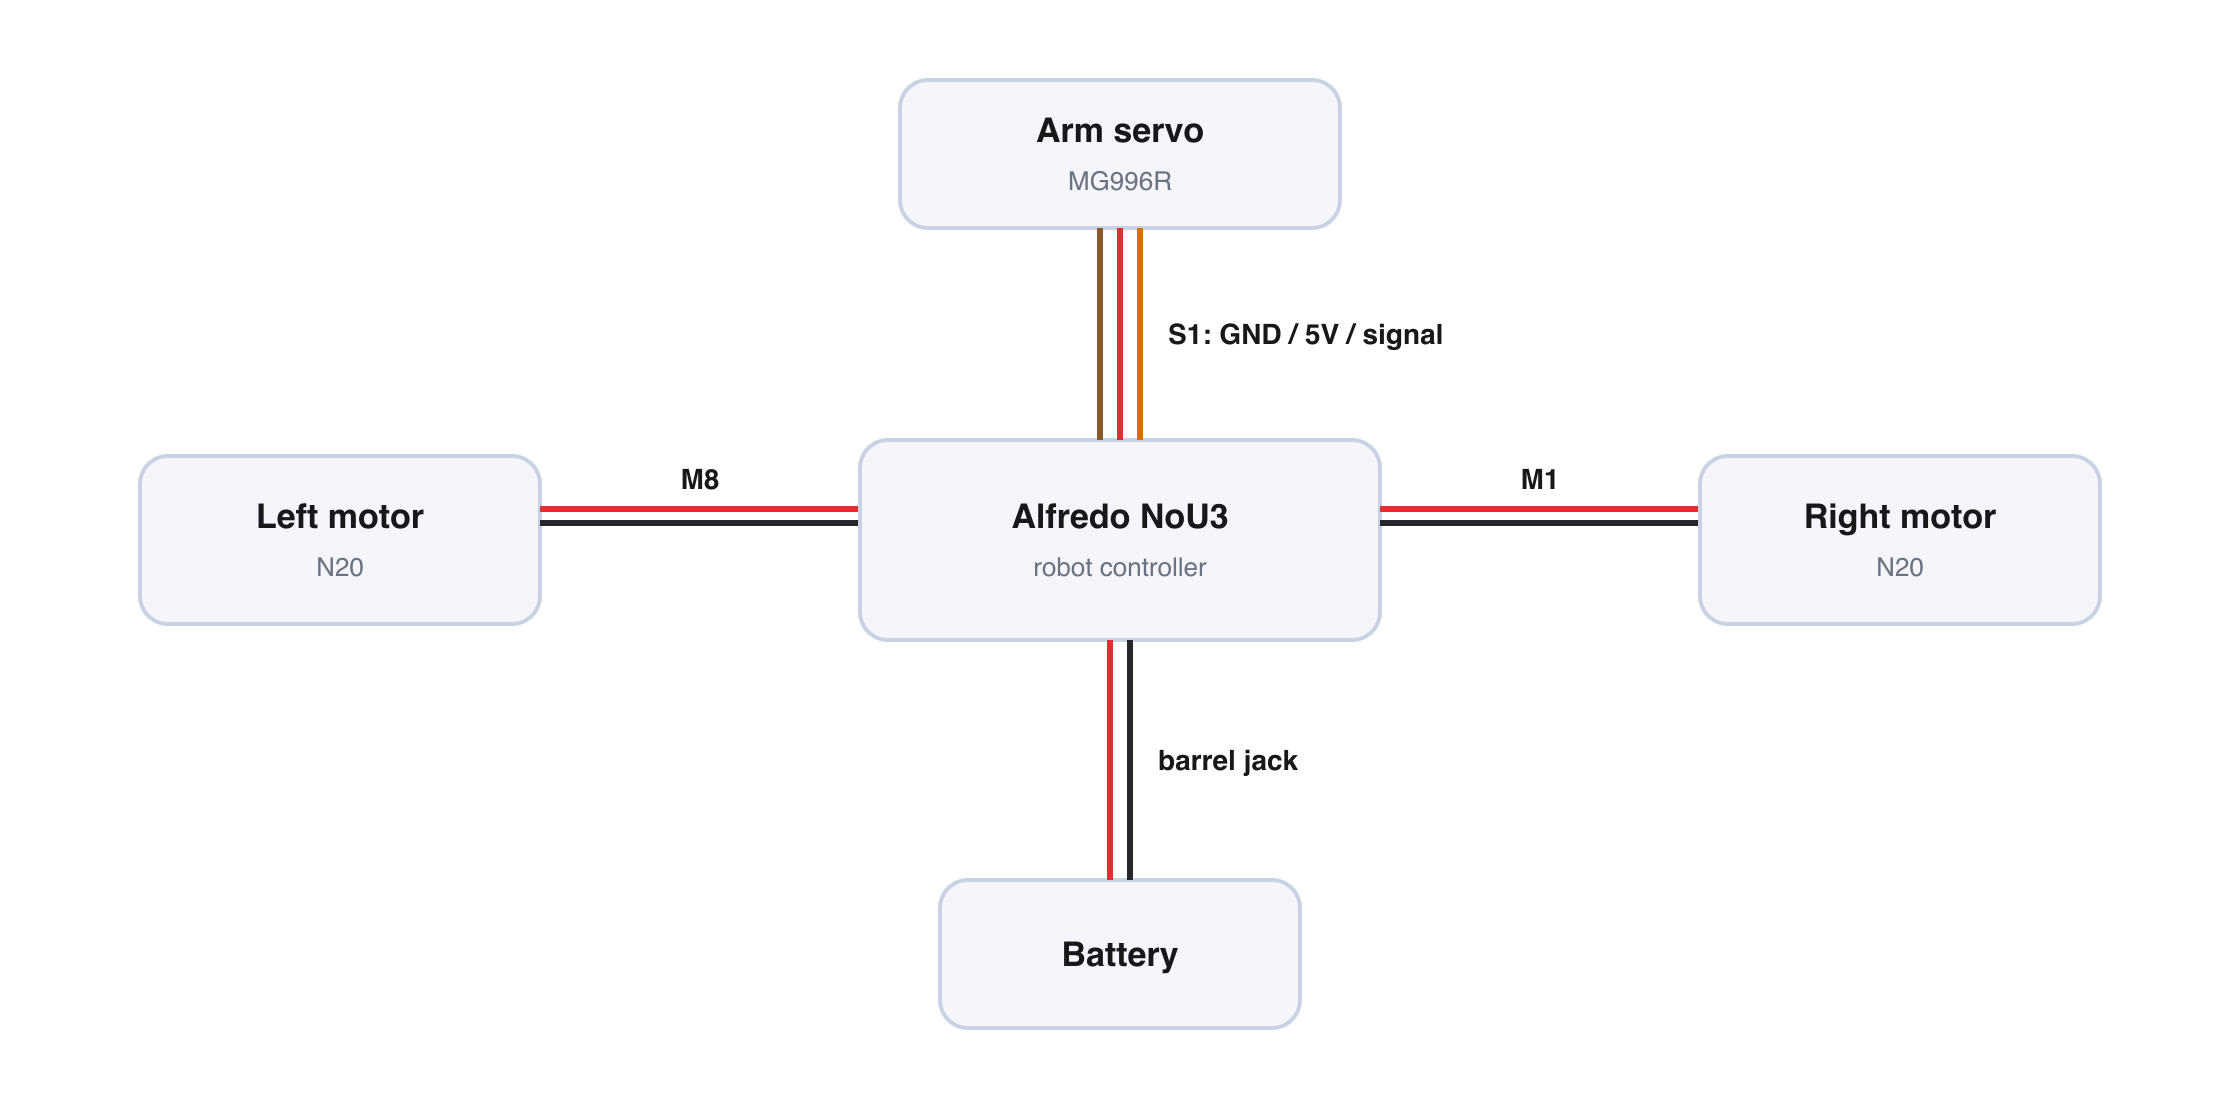
Keep the battery unplugged while tightening the screw terminals. Give each motor wire a gentle tug afterward to confirm it is clamped. The red and black lines in the diagram identify each motor's wire pair, not its final polarity; the bench test below establishes direction.
2. Upload the drive code
This expands the direct-controller sketch from Making a motor move for two drive motors and the arm. The left stick controls forward and backward, the right stick turns, and holding A moves the arm to its other position.
#include <Arduino.h>
#include <Alfredo_NoU3.h>
#include <BLEGamepadClient.h>

XboxController controller;

NoU_Motor right_drive_motor(1); // M1
NoU_Motor left_drive_motor(8);  // M8
NoU_Servo arm_servo(1);         // S1

NoU_Drivetrain drivetrain(&left_drive_motor, &right_drive_motor);

constexpr int ARM_BUTTON_HELD_DEG = 0;
constexpr int ARM_BUTTON_RELEASED_DEG = 180;

void setup() {
  Serial.begin(115200);

  NoU3.begin();
  controller.begin();
}

void loop() {
  if (controller.isConnected()) {
    XboxControlsState controls;
    controller.read(&controls);

    // Split-stick arcade drive:
    // Left stick Y = forward/backward; right stick X = turn.
    float throttle = controls.leftStickY;
    float rotation = controls.rightStickX;

    drivetrain.arcadeDrive(throttle, rotation);

    // Hold A for 0°; release it for 180°.
    arm_servo.write(
      controls.buttonA ? ARM_BUTTON_HELD_DEG : ARM_BUTTON_RELEASED_DEG
    );
  } else {
    // A lost controller connection must stop both drive motors.
    drivetrain.arcadeDrive(0, 0);
  }

  delay(2);
}
3. Bench test and calibrate
- Robot on a block so the wheels are off the ground.
- Put the Xbox controller in pairing mode. The NoU3 scans for it directly; no phone, laptop, or PestoLink page stays in the control loop.
- Push the left stick forward. Both wheels should spin in the same direction.
If one runs backward, swap that motor's two wires in its screw terminal. If
both run opposite the intended forward direction, negate
throttlein the sketch. - Test the arm with a hand next to the power switch. Release A, then hold it briefly. Switch off immediately if the linkage binds or the servo buzzes. The supplied 0° and 180° positions are the intended endpoints, but servo horns and printed fits vary. Bring either constant inward in 5° steps until both positions stop cleanly without straining the linkage.
4. Close the chassis
Switch off and unplug the battery.
Do not drive with loose electronics. The first physical build still needs to establish how the NoU3 and battery are retained. Do not close the chassis or continue to the floor test until both are firmly secured with a method that cannot contact a wheel, linkage, or exposed terminal.
Once retention is settled, arrange the leads so none can touch a moving part or cross a screw hole. Fit the deck, check that no wire is pinched, confirm the printed holes line up, and install the matching M3 hardware.
5. First drive
Put the robot on the floor. Drive a square, lower the scoop, pick something up, and confirm the tuned arm positions still clear the chassis.
The starter bot is now ready for driving practice.